Wednesday, May 30, 2007

Arugula-Basil Pesto

Arugula is fairly new addition to our kitchen and am still trying out different ways of using it.
It has a lovely tart taste. Almost bitter; but in a good way. Add just a handful of arugula leaves to your usual salad for an unbelievable zip.
According to the wikepedia entry arugula, a member of the mustard family, is rich in vitamin C and iron.

A recent CSA bag had both, arugula and basil. It was a no brainer to use them to make a pesto.
The bitterness of the arugula complimented the sweetness of the basil very well. The pine nuts added a crunch. This one is a keeper!
Sugar is not a traditional ingredient of pesto, but I think it helped mellow the arugula slightly and consequently made it more palatable for the young'uns.


Arugula-Basil Pesto
Ingredients
2 cups arugula leaves
2 cups basil (any kind)
1/2 cup pine nuts, lightly toasted
1/2 cup olive oil
5 large garlic cloves, peeled
salt to taste
1/2 tsp sugar
juice of 1/2 lemon

Method
Combine the arugula and basil in a food processor and pulse till you get a coarse mixture.
With the motor running add the garlic cloves, one at a time.
With the motor still running drizzle the oil, add the sugar and salt (start with 1 tsp) and lastly, the pine nuts.
Stop while you still see pieces of the nuts.
Immediately add the lemon juice and mix well.
Adjust the salt.
Transfer to a container and store in the refrigerator for up to a week.

Serving Suggestions
--I spread some of this pesto on an english muffin, topped it with fresh mozzarella and some red pepper flakes like this:


--Mix 4-5 tbsp of the pesto with one can of cannellini beans (pureed) for a fantastic vegan dip.
--Add the pesto to any canned or ready-to-serve soup to perk it up.
--And of course, with pasta.
Friday, May 25, 2007

Radish & Red Rice Pulao

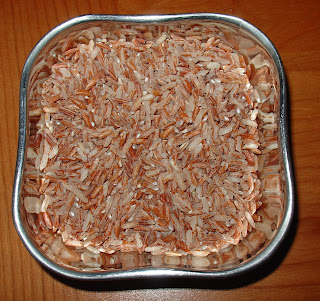
The front of the packet said 'Red Rice from Sri Lanka', the flip side had a huge label 'Brown Rice'. This I had to try!
Not having any experience cooking red rice, I treated it as I could brown rice.

The addition of red radish made it a legit 'R' dish for Nupur's blog event.


Don't let the blah appearance fool you, the pulao was quite tasty. The radishes added a nice crunch. The nuttiness and the texture is like brown rice. The benefits of using such an hulled rice are well know. More about that here.


Radish & Red Rice Pulao

Ingredients
2 cups red rice, washed and soaked in warm water for 30-45 minutes
4-5 red radishes (halved and sliced into crescents)
2 tbsp tomato paste, thinned with a bit of water
3 tsp oil
1 tsp garam masala (or your choice of masala)
salt, to taste
4-5 stalks of cilantro, chopped
4+ cups water, warm

Method
Heat a tsp of oil in a kadai (wok), when hot add the radish.
Cook the radishes slightly. With a slotted spoon transfer the radishes to plate/ dish.
Add the rest of the oil to the kadai.
Drain the rice and add to the oil along with the masala and tomato paste. Saute a bit.
Add the water and mix well.
Cook covered for 6-7 minutes.
Add the radishes and salt. Continue cooking for another 5-6 minutes.
Do a taste and texture test. The rice should be slightly chewy (it will never seem fully cooked the way white rice does).
Add more water or salt, as required.
Garnish with cilantro.
Enjoy!

Serving Suggestions
We enjoyed our pulao with a raita.
But since the pulao tastes good even at room temperature, it would make a nice appetiser if you serve small balls of the pulao in lettuce cups like this:

Variations
Instead of tomato paste, you can use lemon juice. The redness of the pulao will be slightly reduced.
Any vegetable can be substituted for the radish.
Add some beans and you have a one dish meal.

This is my entry for Nupur's A-Z of Indian Vegetables series.

Wednesday, May 23, 2007

Anyone for Waffled Idlis?

This is one kitchen experiment that didn't go awry.
I had just made idli batter and wondered about the outcome if I used some of it in the waffle maker.

This is what I did:

  • Mixed about 1/8 tsp of yeast into two cups of idli batter and let it sit for a while, 5-10 minutes.
  • Poured generous amounts of the batter in a well oiled waffle maker. (If enough batter is not used, the results are quite disastrous where the waffle separates into two layers. Not good.)
  • Waited for the 'ready' indicator to light. (The ready indicator may change with the brand of waffle maker. Mine is a simple one, red light for 'not ready' and green light for 'ready'.)
  • Voila, waffled idlis.
    Nice and crunchy.

They were gone in no time. Not that we need any coaxing to consume idli or any of it's relatives.

I tried using fermented idli batter as well but the results were very disappointing. The batter stuck to the sides very badly and increasing the amount of batter didn't help one bit. They looked very sad.

Saturday, May 19, 2007

Weekend Equal Opportunity Kitchen

My kids offer to help me in the kitchen fairly regularly. But on most weekday evenings I'm just trying to 'get things done---fast' that I'd much rather go solo. Weekends are another matter. I look forward to and accept any offer of help.
It is a lot of fun! With so many sous-chefs bustling around and jostling for space in our small kitchen and accommodating the last minute improvisations which are the rule, it is always amazing that we do get everything on the table in time.

Here is one of our typical spring-summer, free-form, no-recipes-required weekend lunches:
  • panini-style sandwiches
    Bread, fresh mozzarella, tomatoes, fresh spinach, anything goes.
    For a sweet sandwich, peanut butter and bananas (Elvis Lives).
    We don't have a panini press, so we make do with a non-stick pan and a flat pot lid! Works for me. Especially since my son does the work!
  • salad
    mixed greens with fruits and nuts mixed in.
    The vinaigrette is simple: 1 part vinegar (my current favourite is white balsamic vinegar) + 2 parts olive oil, salt, black and red pepper.
    The white balsamic doesn't colour the salad and lets the greens shine thru'.
  • fresh fruit smoothies
    Fruits and yoghurt. No fixed proportions.
    One would have to try real hard to mess this!

Our Version of a Panini Press:


Mixed Greens with Oranges and Blueberries:


Our Lunch: Sandwiches, Mixed-Greens Salad and a Smoothie:


The spouse's involvement? He wisely left us to do our thang. But returned in time to join us for lunch and to lavishly praise our efforts!

Thanks, Trupti, for hosting this Spring Fling 2007 event.

Wednesday, May 16, 2007

Quinoa: The Mother Grain

Quinoa (keen-wah) has been cropping quite often in food-related news and since we like trying out new ingredients, especially vegetables and grains, it was a matter of time before it showed up on our dinner table.

Quinoa is native to the Andes Mountains of Chile, Peru and Bolivia and has been grown there for about 6000 years! Its protein content is unusually high, contains a balanced set of essential amino acids, is a good source of dietary fibre, phosphorus, magnesium, and iron and is gluten-free. No wonder the Incas called it the mother grain.

This is what uncooked quinoa looks like:


It was easy to get Quinoa; Trader Joe's carries it. Preparing it was another matter. I was at a loss for ideas.
My son suggested I add curry leaves and Ajji's masala (literally it means grandma's masala which is nothing but good ol' Maharashtrian goda masala).

I followed the instructions on the package to cook it (1 part quinoa, 2 parts water, cook till the water is absorbed, 10-15 minutes). Cooked quinoa doesn't have a distinctive taste of its own, which is a good thing as it means one is free to improvise.
Plain cooked quinoa looks like little translucent pearls with a ring around them. Very pretty. Take a look:


Quinoa: With Goda Masala
Ingredients
2 cups quinoa, cooked
4-5 curry leaves
1 tsp goda masala (if unavailable, garam masala will work just as well. different flavour, though)
1 tbsp oil
1/2 tsp mustard seeds
1 tsp turmeric powder
pinch of hinga (asafoetida)
pinch of sugar
cilantro for garnishing
salt, according to taste

Method
Heat oil, when hot add mustard seeds.
When the seeds sputter, add the hinga and turmeric.
Add the curry leaves and the masala.
Add the quinoa and turn off the heat.
Add the salt and sugar.
Mix very gently until well combined.
Add cilantro.
Enjoy!


Verdict
The quinoa with goda masala was immensely enjoyed.
The texture was like al-dente couscous.

Variations
We now want to try quinoa with:
-basil pesto and Parmesan
-sauted onions & peppers
-in a soup; such as Trupti's corn and zucchini soup
-in a sweet dish, quinoa-kheer sounds good!


I'm quickly sending this quality quaint grain, quinoa, to Nupur for her A-Z of Indian Vegetables series.

Monday, May 14, 2007

Vegan (Almost) Chocolate Pie

The oven had turned uncooperative.
The Baker was idle.
Even the Maytag man seemed busier.
There was unrest amongst the younglings.
The paternal figure led the protest.
Dessert! Dessert! Dessert!


It would be no exaggeration to say that this chocolate pie restored peace and harmony in the household. Nicole, of bakingbites (previously bakingsheet.blogspot.com) is an extraordinary resource for bakers. Very well written, great pictures, and her recipes always turn out just right. Stop by her blog, if you haven't before.

Now back to the pie: this no-bake pie is made with an unexpected ingredient, silken tofu. Wonderfully soft and remarkably satisfying.

The original recipe calls for 2 cups of chocolate chips. After much experimentation, I discovered that the combination of 1/2 cup milk chocolate chips and 1 -1/2 cups bittersweet chocolate chips is the best. Also, Guittard chocolate chips were the clear winners.

About the almost vegan part: if you use only bittersweet chips and skip the pie crust, you have a vegan pie!

Give the pie a try. It is magical. It successfully handled my belligerent younglings, didn't it?


Update: This pie is on it's way to The Spice Cafe for the Monthly Blog Patrol: Something Sweet.

Thursday, May 10, 2007

(Stuffed) Peppers

Growing up, we found bell peppers 'funny'. They are called by such hilarious names: bhongi mirchi, dhabbi mirchi, dhabboo mirchi and even simla mirchi. I can understand the bhongi, dhabbi, and dhabboo part. They all refer to the size and shape: knobby-chubby- tubby.
Why simla mirchi, I don't know.

This version of stuffed peppers is a departure from the way they are usually made. I wanted to use ginger and garlic but the kasuri methi was a last minute addition. The methi added a wonderful dimension of flavour and left me pleased with myself!


Stuffed Peppers

Ingredients
4 Bell Peppers, tops removed and each pepper cut vertically into two
1/2 cup chopped veggies like carrots, bell peppers, or peas (optional, only for extra colour)
1 large potato, boiled and grated (or mashed)
1-2 tsp ginger-garlic paste
1 (generous) pinch kasuri methi
salt, to taste
1 tbsp oil + extra to coat the peppers inside out
Cilantro, for garnishing

Method
Preheat oven to 350F.
Line a baking sheet with foil.
Oil the peppers lightly and place them on the sheet, cut side down.
Bake for about 15 minutes.

Meanwhile, prepare the filling.
Heat oil in a wok (kadhai) and add the ginger-garlic paste.
If the paste sticks to the wok, add a little water.
Add the kasuri methi and fry for about a minute.
Add the potatoes, salt, and the veggies (if using).
Mix well and turn off the heat.

Stuff the peppers with the filling, place them on the baking sheet and bake again for 15-20 minutes, depending on how soft you want the peppers to be. I baked for 15 minutes, as I wanted them on the crunchy side.
Sprinkle with cilantro.
Enjoy!

Before serving, I further cut each pepper piece in half.
We had the peppers with rice, but they will also go well with rotis/ parathas.
Before dinner, I noticed small hands sneakily stuffing a stuft pepper in their small mouths. So they are sure to make good appetizers. Especially since they taste just as good at room temperature.

The peppers are on their way to Nupur for her A-Z of Indian Vegetables series.

Monday, May 7, 2007

A Taste of Yellow: Cornflakes Chivda


My son's grade school teacher loves chivda and 'can't get enough of it'.
This nugget of information was discovered when I did a Diwali presentation in my son's class. I had taken with me an assortment of Diwali goodies: bite-sized versions of laddo, chakli, barfi, and a huge bowl of chivda. The teacher took one look at the chivda and whispered, "If we have any leftovers can I take it home with me?".


Chivda is a quintessential Maharashtrian snack. But snacking crosses all boundaries and the simple chivda is proof of that.
Surprisingly easy to make but so satisfying that one truly 'can't get enough of it'.
Each Maharashtrian household has it's version of chivda and the variations are endless.

My version of this crunchy snack uses cornflakes cereal.

Ingredients
5-6 cups cornflakes cereal
1/2 cup roasted peanuts
1/3 cup roasted cashew pieces (optional)
1/3 raisins or cranberries
10-12 curry leaves (kadhilimba)
2 tsp mustard seeds
1 tsp fennel seeds (badishep), lightly roasted
1 tsp turmeric
1 tsp red chilly powder (adjust quantity as per liking)
4 tbps oil
1 tbsp lemon juice
salt and sugar to taste

Method
Heat oil in a medium sized wok (kadhai).
Add the mustard seeds and when they start sputtering, add the turmeric.
Add the curry leaves, peanuts, raisins/ cranberries, and cashews (if using).
Cook for about a minute and then add the fennel seeds, the chilly powder, and the lemon juice.
Next, add the salt and the corn flakes and turn off the heat.
Mix till the corn flakes are well coated with the spices.
Let cool slightly before adding a couple of tablespoons of sugar.
Adjust the salt.
Enjoy!

Stored in an airtight container, chivda will stay fresh for at least a week. But honestly, it will be gone within days.

This chivda goes with my son to school tomorrow.
It also goes to Barbara who is hosting A Taste of Yellow.
Thanks, Barbara, for hosting and wish you the very best.

Friday, May 4, 2007

O...is for Olive-Onion Naan

It is May, but you wouldn't know that if you live in Northern California. All this week, we've had overcast, partly cloudy days. If that was not enough, it rained; in May. Sure, the Sun peeped magnanimously once in a while, but the winds made sure even that was short lived. Lousy weather.
With that I conclude this unsolicited weather report and get to the point of this post.

With the weather being the way it is, we needed some comforting. The kind of comforting only freshly made naan can provide. Did that mean, I ordered some from the friendly, neighbourhood, Indian-food purveyor? Naan-sense.

I came across this recipe for naan made on a pizza stone and followed it diligently it to make Olive-Onion Naans. The only change I made was in the the kind of flour used. I used white, whole-wheat flour. No, that is not an oxymoron. When I first saw this at Trader Joe's, it seemed too gimicky. But when I noticed the brand: King Arthurs, I just had to try it out.


The naans were just wonderful. The pizza stone made them 'Crunchy on the outside and soft on the inside' as my youngest tyke said borrowing words from her favourite Food Network hostess.

The colour was light-brown, somewhere between the white of the all purpose flour and the brown of whole wheat flour.

The texture, though, was just like that of whole wheat flour.

We were plenty comforted.


Comforted enough to try something else, Olive Bites.


As the oven was already cranked up, I wrapped puff pastry around some olives (I used regular black olives and green olives stuffed with garlic) to make these two-bite delights. These baked for about 10 minutes in a 350F oven. The salty olives with the flaky puff pastry....just delicious.


These Olive-Onion Naans and the Olive-bites now go to Nupur's A to Z of Indian Vegetables.

**Update**: fixed the link for the naan recipe.

 
Add to Technorati Favorites